A weak hiring process can cost a small nonprofit more than time - it can cost the hire. In this guide, I show a simple hiring path that covers role approval, scorecards, screening, interviews, references, offers, and the first 30 days. The goal is to cut guesswork, keep decisions clear, and lower the risk of a bad start.
Here’s the full process in plain terms:
- Approve the role first so the team knows the budget, manager, pay range, and start date.
- Set must-haves and nice-to-haves before reviewing applicants.
- Build one scorecard so every candidate is judged the same way.
- Write a clear job post with the salary range, tasks, and instructions.
- Screen every applicant the same way based on skills, pay fit, and follow-through.
- Use structured interviews with the same core questions for each finalist.
- Give one job task to test work quality, judgment, and deadline handling.
- Check references and work history before sending the final offer.
- Plan Day One through Day 30 before the new hire starts.
A few numbers stand out: 6 in 10 managers have lost a new employee due to poor onboarding, and some surveys say 78% to 85% of applicants misstate parts of their background or skills. That’s why I’d treat hiring and onboarding as one process, not two separate tasks.
If I were building a small-team hiring system, I’d keep it simple: one owner per stage, one scorecard, one decision rule, and one written 30-day plan.
| Hiring Step | What I’d lock in |
|---|---|
| Role approval | Budget, manager, salary, start date |
| Scorecard | Skills, traits, weights, ratings |
| Screening | Same checklist for every applicant |
| Interviews | Same questions and scoring |
| Assessment | One timed, job-related task |
| Verification | References, job history, checks |
| Onboarding | Written first-30-day plan |
Below, the article walks through each step in more detail with examples I can use right away.
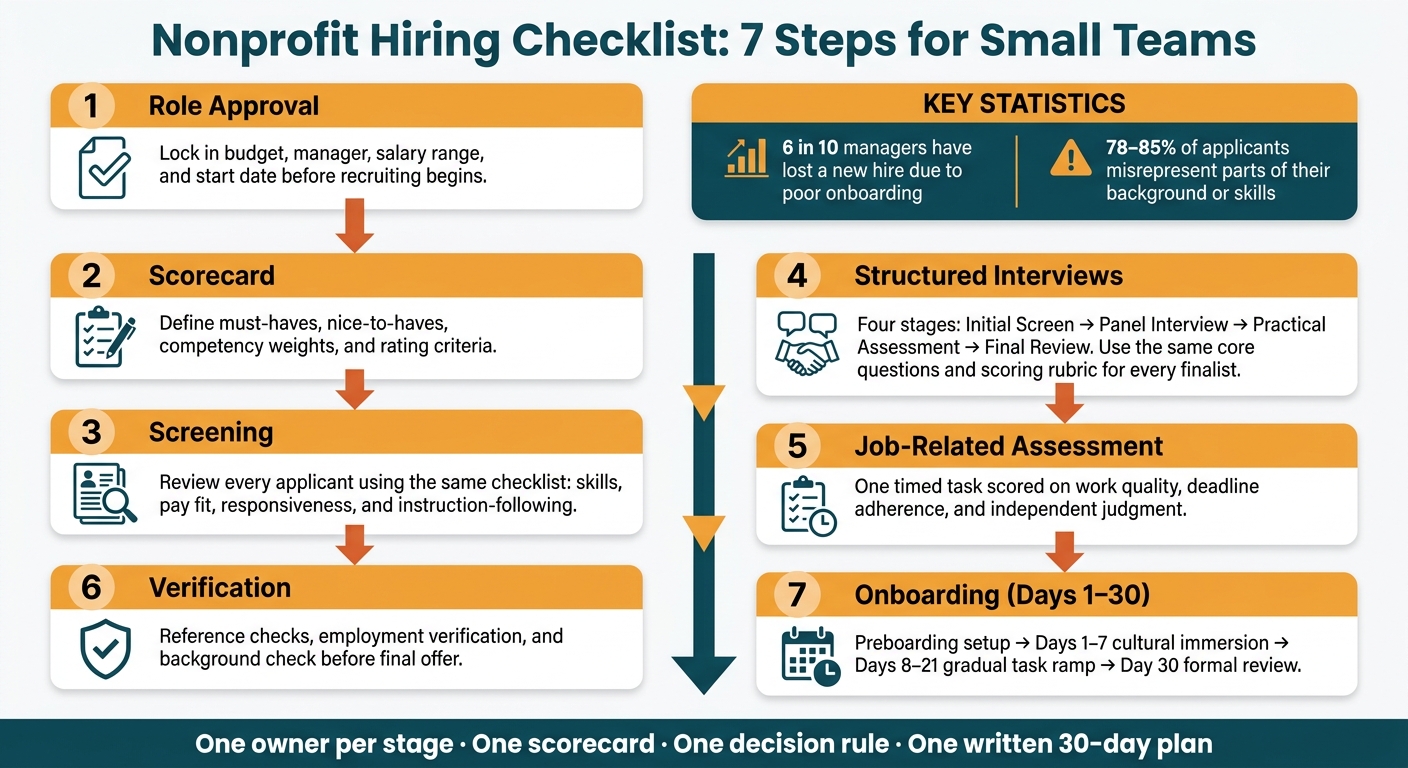
Nonprofit Hiring Process: 7-Step Checklist for Small Teams
Checklist to Hire Your First Employee | Starting a Nonprofit
sbb-itb-c53a83b
Approve the Role and Build the Hiring Scorecard
Before you post a job, make sure the role is actually needed. Sometimes the work can be reassigned, automated, or handled by a contractor. If the need is only about 10 hours per week, a contractor is usually the lower-cost choice than moving straight to a full-time hire.
Set the basics before recruiting starts: salary range, benefits, schedule, location, reporting line, budget source, and target start date. Also name one hiring manager to own the process from start to finish. Permanent headcount changes should still require executive-level sign-off, while the hiring manager handles day-to-day hiring calls within their authority. That setup makes the next step - defining qualifications - much faster.
Define Must-Haves, Nice-to-Haves, and 30/60/90-Day Outcomes
Before applications come in, split qualifications into two buckets: must-haves and nice-to-haves. Then connect each must-have to a clear 30/60/90-day outcome. This keeps interviewers focused on early job performance instead of vague ideas about potential.
Here’s the benchmark:
- By day 30, the new hire is onboarded and doing the work with light oversight.
- By day 60, they handle core tasks on their own.
- By day 90, they make routine decisions and finish priority work on time.
Build a Candidate Scorecard Before Recruiting Starts
A scorecard keeps the process consistent. Without one, interviewers tend to judge candidates using different standards. Build the scorecard before outreach begins and use these six columns:
| Column | What to Include |
|---|---|
| Competency | Specific trait or skill (for example, stakeholder communication or mission judgment) |
| Weight | How important this competency is to the role: high, medium, or low |
| Evidence | A behavior-based question or task that brings out this trait |
| Interview Stage | The point in the process where this competency is checked, such as screening or final interview |
| Rating | A numeric score, such as 1-5, given after that stage |
| Notes | The interviewer’s notes explaining the score |
For nonprofit roles, the scorecard should cover areas like independent decision-making, mission judgment, and stakeholder communication. Use the same scorecard to shape the job description and to screen applicants, so everyone is being judged against the same standard.
Write the Job Description and Run Focused Screening
Use the scorecard to turn role priorities into plain, direct language in the job description. For a small nonprofit, put more weight on mission fit and the work habits people need on a lean team. Technical skills can come later.
Keep the posting easy to scan. Include the job title, salary range in USD, core responsibilities, required qualifications, preferred qualifications, application instructions, and closing date. Be clear about how the team works day to day. Spell out communication norms, response times, and deadline expectations so applicants know what the job will actually feel like.
The same scorecard should also shape your screening checklist. That keeps hiring tied to the role instead of gut feel.
Keep the title functional, not puffed up. “Program Coordinator” usually says more than something flashy and vague. For responsibilities, describe the work as recurring daily, weekly, or monthly tasks. That makes the role easier to picture and helps applicants decide if it fits.
In the application instructions, add a small sample task with a clear deadline. This gives you a simple way to check responsiveness and attention to detail before you spend time on interviews. If money is tight, say so through the offer itself: show the salary range, then point to non-cash perks like flexible hours, community activities, and room to grow in the role.
Use a Consistent Screening Checklist for Every Applicant
Screening works better when every applicant is reviewed the same way. A simple screening grid can keep the process steady and easier to defend.
Review each person for:
- Required competencies
- Compensation fit
- Responsiveness
- Whether they followed instructions
Write down each decision and the reason for any decline. That could be a compensation mismatch, an incomplete sample task, or missing required qualifications. This step may feel basic, but it saves a lot of backtracking later.
Keep Sourcing Narrow and Mission-Aligned
For small teams, narrow sourcing usually beats posting everywhere. Referrals, alumni networks, community organizations, and professional associations often bring in stronger leads with less admin work.
Look for direct signs that the person cares about the space. That might include volunteer history, active membership in relevant networks, or personal projects tied to the field.
Move only screened candidates into structured interviews and the job-related assessment.
Run Structured Interviews and One Job-Related Assessment
Once you’ve screened candidates, move into a short, structured interview process. The goal is simple: help a small team compare people fairly without burning too much staff time.
For lean nonprofits, a four-stage process works well: an initial screen, a panel interview, a practical assessment, and a final review. Keep each stage short, clear, and owned by one person. One person should handle scheduling, note-taking, and candidate updates from start to finish.
Use the Same Core Questions and Rating Rubric for Every Finalist
Skip weak questions like "Where do you see yourself in five years?" Ask questions tied to the work instead. For example: "Tell me about a time you had to deliver a project with fewer resources than you expected." That gives you a much better sense of how someone handles pressure, limits, and day-to-day problems.
To keep the panel focused, give each interviewer one or two scorecard competencies. That way, the group covers the full role without everyone asking the same thing. Each interviewer should score the candidate on their own before any team discussion starts.
Stay away from questions about protected characteristics, including age, religion, national origin, marital status, or disability. You should also have a clear process for reasonable accommodations so each candidate can take part fully.
Compare Interview Stages in a Decision Table
After the panel interview, use one scored task to check whether the candidate can actually do the job. Score the task on work quality, deadline adherence, and independent judgment. If a candidate asks too many clarifying questions, that can point to weak independent judgment. Use the same scorecard criteria for every finalist so comparisons stay fair.
| Interview Stage | Purpose | Participants | Evidence Collected | Decision Rule |
|---|---|---|---|---|
| Initial Screen | Filter for fit | Hiring Owner | Clear communication, basic skills | Pass/Fail based on scorecard |
| Panel Interview | Test role fit | Team peers and manager | Behavior-based responses, mission alignment and job-ready skill | Independent scoring average |
| Practical Assessment | Confirm work output | Hiring Owner | Work quality, deadline adherence | Scored against predefined criteria |
| Final Review | Confirm final alignment | Executive or director | Strategic alignment, motivation integrity | Final decision by owner |
Bear in mind that 85% of job applicants misrepresent their capabilities during the assessment phase, which is exactly why a scored, time-boxed task matters more than self-reported skills.
Once the finalist clears the assessment, move to references and offer terms.
Complete References, Make the Offer, and Prepare for Day One
After the finalist clears the assessment, check the record, lock in the terms, and get onboarding ready.
Verify References and Offer Terms Before You Commit
Reference checks are not just box-ticking. According to a Checkster Research survey, 78% of applicants misrepresent themselves during the hiring process. That number is hard to ignore. So don’t lean only on written references. Call people directly and confirm how the candidate performed, how dependable they were, and whether their track record lines up with what you already saw in screening and interviews.
Ask pointed questions. You’re trying to confirm past results, not collect vague praise. Verify credentials and job history, then complete any background check tied to the role before you make the final call.
| Verification Step | Purpose | Consent Required | Timing | Owner |
|---|---|---|---|---|
| Reference Check | Validate professional track record | Verbal or written | Post-final interview | Hiring Manager |
| Employment Verification | Confirm titles and dates | Written | Pre-offer | HR / Admin |
| Background Check | Ensure safety and role-specific risk | Written (mandatory) | Post-offer, contingent on hire | HR / 3rd Party |
Once the checks are done, move to the verbal offer. Go over pay, start date, work schedule, and any must-have duties before anything is sent in writing. Then send a written offer that matches the verbal terms exactly. No surprises, no mixed signals.
Plan the First 30 Days Before the New Hire Starts
A clear first 30 days helps the new hire get moving without confusion. It also keeps the team from having to redo work later.
Before Day One, finish payroll setup, benefits, Form I-9 paperwork, equipment delivery, and system access. Assign an onboarding buddy - a specific team member the new hire can go to with questions during the first few weeks. Preboarding should run like a checklist, not a casual pass-off between teams.
| Time Period | Objective | Owner | Evidence of Progress | Support Required |
|---|---|---|---|---|
| Preboarding | Payroll setup, equipment delivery, and system access | Ops / HR | Login credentials active; hardware received | IT / HR Support |
| Days 1-7 | Cultural immersion and buddy intro | Manager | Welcome meeting complete; initial tasks started | Onboarding Buddy |
| Days 8-21 | Gradual increase in task complexity | Manager | Independent handling of low-priority work | Weekly 1-on-1s |
| Day 30 Review | Formal performance and fit assessment | Hiring Manager | Completed review; KPI scores meet target | Peer feedback |
Use the Day 30 review to compare actual progress against the scorecard.
Conclusion: What a Complete Nonprofit Hiring Checklist Should Deliver
A complete hiring checklist should connect role approval, scorecarding, screening, interviews, verification, and a 30-day plan into one clear process. The key is simple: each stage needs a clear owner and a clear decision rule. If that part is fuzzy, the whole thing can slow down.
Give each stage one owner and one decision maker so the process keeps moving.
For a small nonprofit, one bad hire or one chaotic first month can throw off the entire team. When headcount is tight, there’s not much room for drift.
Here’s what each checkpoint needs to deliver:
| Hiring Stage | Core Checkpoint | Why It Matters |
|---|---|---|
| Role Approval | Clear ownership and budget sign-off | Prevents delays and scope creep |
| Scorecard | Documented hiring criteria | Defines what "good" looks like before recruiting starts |
| Screening | Standardized applicant checklist | Keeps evaluation consistent across candidates |
| Interviews | Behavior-based rubric for every finalist | Surfaces real performance signals |
| Verification | Reference and background checks completed | Reduces the risk of poor hires |
| Onboarding | Written 30-day plan with milestones | Treats the first month as part of hiring |
That’s how a small team hires faster and with less guesswork.
FAQs
How do I build a hiring scorecard for a small nonprofit?
Start by defining the core values and must-have traits for the role. Then build a skill matrix that puts the main things front and center, like communication, problem-solving, and technical proficiency.
From there, use behavior-based interview questions to test candidates against those standards. This helps you judge people based on what they’ve actually done, not just how well they talk in an interview.
As your team grows, tighten up the scorecard with role-specific needs and clear differences between senior and junior expectations. That way, evaluations stay more consistent and less subjective.
What should I include in a candidate work sample?
Include a small, role-specific project that shows how the person works in practice, not just how they talk about the work. The task should match the format your team already uses so you can judge fit in a realistic setting.
Be clear about what to do, what “done” looks like, and how long the person has. Tie the work to your team’s current goals and expected pace. That way, you’re testing the right skills instead of giving a generic exercise.
This kind of project should do more than test output. It should also show how the person solves problems, explains choices, and works through tradeoffs. If it fits the role, ask them to include things like:
- Decision notes that explain why they made key calls
- Short documentation that another teammate could pick up
- Collaboration artifacts, like comments, handoff notes, or a draft message to a partner team
A brief scorecard makes review much easier. Keep it simple and focused on the things that matter most:
- Quality: Is the work accurate, polished, and useful?
- Clarity: Is it easy to follow and well explained?
- Standards: Does it match your team’s process, style, or bar?
- Speed to iterate: How well and how fast can they improve the work after feedback?
If you want a better read on judgment, ask for short reasoning alongside the final output. That helps you see whether a strong result came from a solid process or just a lucky guess.
How can I tell if a contractor is better than a full-time hire?
It comes down to your business needs and how much hiring risk you're willing to take on.
A contractor can make sense for a lean team or during uncertain periods. It gives you room to get work done without jumping straight into a full-time hire.
A contract-to-hire setup gives you time to see how someone actually works before you make that commitment. You can assess:
- Productivity
- Communication
- Independence
- Cultural fit
If things click, you can move that person into a permanent role.